
티스토리 뷰
객체검색
- 이벤트 등록, 제거 혹은 특정한 대상에 값 수정, 삭제, 부여하기 위해서는 객체 검색이 필요하다.
아이디 값으로 객체 검색
- document.getElementById('아이디명');
- 아이디는 대소문자를 구분하는 문자열로, 문서 내에서 한다. 즉, 하나의 값은 하나의 요소만 사용할 수 있다.
- 주어진 문자열과 일치하는 id 속성을 가진 요소를 찾고, 이를 나타내는 Element 객체를 반환합니다.
- 아이디라는 속성에 유일값을 가진 태그 객체 검색
<div id="myTextGroup">
		<span id="mySpan">안녕하세요.</span>
		한국스마트정보교육원입니다.
	</div>
var myTextGroup = document.getElementById('myTextGroup');
var mySapn = document.getElementById('mySpan');
실행결과)
console.log(myTextGroup, {myTextGroup}); //{명칭} 안의 명칭으로 객체가 생성됨.
myTextGroup 이라는 명칭으로 객체가 생성되었다.
myTextGroup.onclick = function(){
			//this -> 이벤트 실행 대상
			console.log(this);
            }
innerText, innerHTML 접근시 하위요소를 텍스트로 가지고 있다.
| innerText | 텍스트 요소만 텍스트로 | 값 대입시 innerText -> 텍스트 요소로만 대입 |
| innerHTML | html 요소를 텍스트로 | 값 대입시 innerHTML -> 텍스트를 html 로 변경해서 대입(html parsing) |
1)
console.log(this.innerText);
<- myTextGroup의 innerText 출력
2)
console.log(this.innerHTML);
<- innerHTML 을 출력
3)
console.log(mySpan.innerText);
<-mySpan의 innerText 출력
parsing -> 다른 데이타 형태를 사용할 데이타로 변환하는 작업
parser -> 데이타를 변환하는 대상(프로그램)
Class 객체 검색
- document.getElementsByClassName('클래스명');
- 클래스속성에 인수값에 해당되는 값을 가진 태그를 전체 검색
- 배열로 값 반환
	<button type="button" class ="myText my-red" value ="1">1</button>
	<button type="button" class ="my-blue myText" value ="2">2</button>
	<button type="button" class ="my-green abc myText" value ="3">3</button>
var myText = document.getElementsByClassName('myText');
console.log(myText);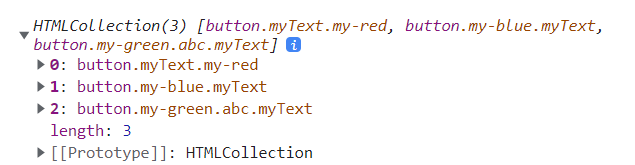
 	for(var i=0; i<myText.length; i++){
		myText[i].onclick = function(){
			this.innerText ='안녕하세요';
			//각  태그가 웹 표준에 준하는 속성에는 접근이 가능
			console.log(this.value);
		}
	}
<- 해당 버튼을 클릭시 버튼의 Text에 각각 '안녕하세요'가 대입된다.

<- 웹 표준에 준하는 속성에는 접근이 가능하기 때문에
클릭할 때마다 value 값이 콘솔에 출력된다.
tag 명으로 객체 검색
- document.getElementsByTagName('태그명');
- 인수값에 해당되는 태그들을 전체 검색
- 배열로 반환
<input type = "text" name ="userName">
<input type = "text" name ="userAddr">
<script type="text/javascript">
var inputs = document.getElementsByTagName('input');
for(var i=0; i<inputs.length;i++){
inputs[i].onkeyup = function(){
console.log(this.value);
}
}
</script>

<- 키보드의 키를 눌렀다가 땠을 때 마다
input 데이터의 value 값이 콘솔창에 출력된다.
선택자로 객체 검색하기
- css 선택자로 객체를 검색 할 수 있다.
- document.querySelector('선택자'); -> 단일 대상 검색
- document.querySelectorAll('선택자'); -> 복수 대상 검색
- 검색된 하위 요소 검색이 가능하다.
querySelector
- css 선택자 상하관계 및 or, and 조건 검색 가능
- 검색된 객체기준으로 하위요소 객체 검색도 가능하다.
<div id="userGroup">
		<input type="text" name ="userName">
		//#userGroup input[name=userName]
	</div>
		<input type="text" name ="userName">
var userName = document.querySelector('#userGroup input[name=userName]');
console.log(userName);
	<div id="myGroup">
		<ul>
			<li>
				<button type ="button" class="myClick"> 클릭 </button>
			</li>
			<li>
				<button type ="button" class="myClick"> 클릭 </button>
			</li>
		</ul>
	</div>
실행결과)
	 var myGroup = document.querySelector('#myGroup');
	 console.log(myGroup, {myGroup});
	 var myClick = myGroup.querySelectorAll('.myClick');
	 console.log(myClick);
<div>
<ul>
<li class="liClick">
<input type="text" name="userName" value="홍길동">
</li>

<li>
<input type="text" name="userName" value="이순신">
</li>

</ul>
</div>
var liClick = document.querySelectorAll('.liClick');
for(var i=0; i<liClick.length; i++){
liClick[i].onclick = function(){
var userName = this.querySelector('input[name=userName]');
console.log(userName.value);
}
}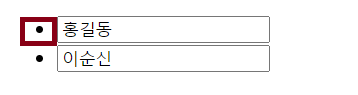
<- li 요소를 클릭하면

addEventListner
- 1개 대상(객체)에 다수 이벤트 등록할 때 쓰인다.
1. on 속성에 함수 다수 등록해보기
- 다수의 함수는 등록이 안된다.
<button type ="button" id="testBtn">클릭</button> <script type="text/javascript">
var testBtn = document.querySelector('#testBtn');
testBtn.onclick = function(){
console.log('testBtn1');
}
testBtn.onclick = function(){
console.log('testBtn2');
}
console.log({testBtn});
</script>
<- 결괏값은 testBtn1, testBtn2 가 출력되는 것이 아닌 testBtn2 만 출력되었다.
함수가 덮어쓰기 되어 최종적인 결과만 출력해준다.
2. addEventListner 다수의 이벤트 등록하기
- 검색된 객체.addEventListner('이벤트명', 함수)
<button type ="button" id="testBtn2">클릭</button><script type="text/javascript">
var testBtn2 = document.querySelector('#testBtn2');
testBtn2.addEventListener('click', function(){
console.log('testBtn2-1');
});
testBtn2.addEventListener('click', function(){
console.log('testBtn2-2');
});
</script>
실습문제.
1. html 요소 이벤트 form. 아래의 폼을 확인하고 버튼 클릭시 계산하여 특정폼에 그 결괏값을 출력하여라.
	<form name="goodsForm">
		<h4>상품</h4>
		<label>
			<input type = "checkbox" name ="goodsList" value="2000"> 사과
		</label>
		<label>
			<input type = "checkbox" name ="goodsList" value="3000"> 배
		</label>
		<label>
			<input type = "checkbox" name ="goodsList" value="4000"> 수박
		</label>

		<h4>수량</h4>
		<select name = "num">
			<option value ="1">1</option>
			<option value ="5">5</option>
			<option value ="10">10</option>
		</select>
		<h4>가격</h4>
		<input type="text" name="totlaPrice" readonly>
		<button type="button" onclick="myFn();">계산</button>
	</form>
풀이)
function myFn(){
		var checkArray = goodsForm.goodsList;
		var num = Number(goodsForm.num.value);
		var sum = 0;
		for(var i =0; i<checkArray.length; i++){
			if(checkArray[i].checked){
				sum += Number(checkArray[i].value) * num;
			}
		}
		goodsForm.totlaPrice.value = sum;
	}
goodList 를 배열로 받아 checkArray 에 대입한다.
체크박스의 value 값을 숫자로 변환하여 num에 대입한다.
checkArray 의 배열을 풀어 각 체크박스가 체크되어 있다면 value 에 해당하는 가격을 숫자로 변환하고, 수량을 곱한다. 반복하여 sum으로 합산한다.
totalPrice 의 value 값에 sum을 표시한다.
2. html 요소 이벤트 form. 버튼 클릭시 체크 박스의 체크 반전이 될 수 있도록 기능을 완성하여라.
function checkFn(){
			var checkArray = checkForm.checkList;
			for(var i=0; i<checkArray.length;i++){
				if(checkArray[i].checked){
					checkArray[i].checked = false;
				}else{
					checkArray[i].checked = true;
				}
			}
		}
체크박스가 체크되어 있다면 -> 체크박스가 체크가 해제(false)
체크되어 있지 않다면 -> 체크박스는 체크된다 (true)
3. document api 실습. 아래의 폼을 확인하고 버튼 클릭시 계산하여 특정폼에 그 결괏값을 출력하여라.
<h4>상품</h4>
		<label>
			<input type = "checkbox" class ="goodsList" value="2000"> 사과
		</label>
		<label>
			<input type = "checkbox" class ="goodsList" value="3000"> 배
		</label>
		<label>
			<input type = "checkbox" class ="goodsList" value="4000"> 수박
		</label>

		<h4>수량</h4>
		<select id = "num">
			<option value ="1">1</option>
			<option value ="5">5</option>
			<option value ="10">10</option>
		</select>
		<h4>가격</h4>
		<input type="text" id="totalPrice" readonly>
		<button type="button" id="priceSum">계산</button>
풀이)
	var priceSum = document.getElementById('priceSum');
		var totalPrice = document.getElementById('totalPrice');
		var goodsList = document.getElementsByClassName('goodsList');
		var num = document.getElementById('num');
		priceSum.onclick = function(){
			var sum = 0;
			var n = Number(num.value);
			for(var i=0; i<goodsList.lenth; i++){
				if(goodsList[i].checked){
					sum += Number(goodsList[i].value) * n;
				}
			}
			totalPrice.value = sum;
		}
		console.log({priceSum});
4. 버튼 클릭시 체크 박스의 체크 반전이 될 수 있도록 기능을 완성하여라.
<h4>상품</h4>
		<label>
			<input type = "checkbox" class ="checkList" value="2000"> 사과
		</label>

		<label>
			<input type = "checkbox" class ="checkList" value="3000"> 배
		</label>
		<label>
			<input type = "checkbox" class ="checkList" value="4000"> 수박
		</label>

		<h4>체크</h4>
		<button type="button" id="allCheck">반전 </button>
var allCheck = document.getElementById('allCheck');
allCheck.onclick = function(){
var checkList = document.getElementsByClassName('checkList');
for(var i=0; i< checkList.length;i++){
if(checkList[i].checked){
checkList[i].checked = false;
}else{
checkList[i].checked = true;
}
}
}
'41기 개발자과정' 카테고리의 다른 글
| 20211102 데이터베이스04 (0) | 2021.11.03 |
|---|---|
| 20211029 documnet api 실습 (0) | 2021.10.29 |
| 20211025 DTO_DAO 권한처리 (0) | 2021.10.25 |
| 20211024 오류 Incorrect integer value: (0) | 2021.10.24 |
| 20211020 32단계_jsp_java_DTO_DAO_list처리 (0) | 2021.10.23 |